Site Builder's Guide
MFSFS (“Multi-Form Sticky Field Sharing”)
Table Of Contents
- Key Concepts (details of available features)
- Form Admin Settings (activating MFSFS for new forms)
- Example Configuring A “Paragraph” Field
- Details for using MFSFS merge tags (rendering saved data)
- Example of “field sharing” between forms (using merge tags)
- Minor Note On Admin Label Naming (internal handling details)
- Clear Data Custom Field (SF_Clear Advanced field for deleting data)
Key Concepts
- You can make any individual field “sticky” and “sharable” by doing these two steps:
- Enable MFSFS in the form’s Admin Settings ( see image below )
- Set the “Admin Label” of a field to begin with the form’s “Group Name”
- “Sticky” fields will auto-save their entry input, and auto-populate when next displayed
- A form’s Admin Settings must enabled to allow any of its fields to be saved and shared
- In the form’s Admin Settings you can define its “Group Name” (eg. “demo1_”)
- To make a field sticky, define its Admin Label to start with that form’s “Group Name”
(eg. A Radio Field calleddemo1_genderand a Name Field calleddemo1_first_name) - Another form’s field using the same Admin Name will act just like the original
- Many saved sticky field’s input can be used in merge tags, and all is accessible to custom PHP code
- Captured and saved field entry values can be “shared” many different ways:
- Pre-loading a Hidden or Number field’s defaults with saved data - ( see merge tag notes )
- Rendering within an HTML field ( via merge tag - ( see image below )
- Sharing captured field values in fields in anther page’s form - ( see example below )
- Easily acquired used in custom PHP code
- Auto re-populating original field entries (aka “sticky fields”)
( note: this also includes other fields set with same Admin Label ! )
- Saved entry data is recorded two possible ways:
- If user is logged in, data is saved into the server’s WP database
- Otherwise, their data is saved into their Session array
( note: the plugin called “WP Session Manager” may support load-balancing requirements )
- An enabled field’s data is captured only when the form is submitted, or when either of the Prev/Next buttons of a multi-page form are clicked
- By pre-populating hidden fields with saved data using merge tags, creative display dynamics are possible, such as using a field’s “Conditional Logic” rules
Form Admin Settings
- Enable a form to capture and save selected fields
- Enable debug log option to capture the plugin’s back-end processing (Optional)
- Define a form’s “Group Name” prefix for selected field Admin Labels
( note: if a field’s Admin Label does NOT have the defined prefix, it will not be saved )
Example Admin Form Settings

In this example we are configuring to capture, save, and make “sticky” any field with Admin Label prefixed with “demo2_” (eg. demo2_first_name for a Name field).
Note that Debugging Levels are only active when Gravity Forms plugin settings have “Logging” enabled.
Example Configuring A “Paragraph” Field for MFSFS
For this example, the field’s MFSFS form settings has its “Shared Group Name” set to demo1_
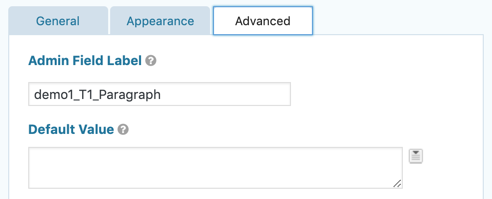
Then, for example you could display a user’s Paragraph field input on another page (even in the same multi-page form) in one or more HTML fields, like this:
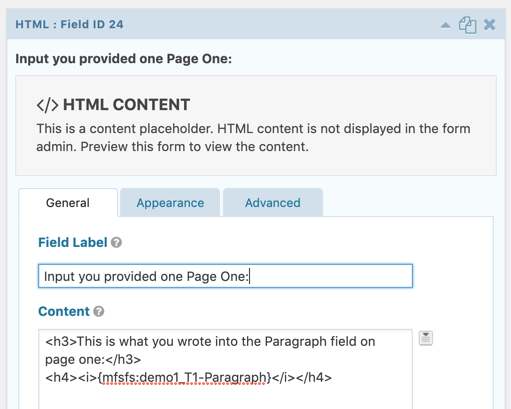
Note how the merge tag’s reference to the saved field’s input value does not quite match the original field’s Admin Label. This is okay, because internally MFSFS converts any merge tag’s dashes and spaces to underscores (more detail info is described below).
Details for using MFSFS merge tags
The many ways and combinations in which you can make use of this powerful feature are too numerous to document. Here are a few general guidelines to help you find creative solutions for your needs:
- An MFSFS merge tag is simply a reference to some field’s Admin Label
- Some MFSFS merge tags can be used in a another field’s default setting
- In a multi-page form, SOME tags get set immediately by the “previous” or “next” button events
- A Hidden field can often provide for clever tricks when using GF’s “Conditional Logic” capability
Below are a few example use cases which should help to better conceptualize the MFSFS merge tag capabilities (also look to the hosted Live Demos to see these examples in action):
- Control which Section field group is displayed based on previous page’s input
- Display a list of query-string formatted links based on input from previous page
- Using a Radio field to control what pages of a Multi-Page form to render to user
Example of form “field sharing” between two different forms
This example is taken from one of the Live Hosted Demos you can try out (Demo 3 - “clothing shopper with profile”).
Conceptually, in the top “shopper profile” form, you can input your clothing sizes. Then, in the “shopper order” multi-page form, you input your order quantities. At the form’s last page, you will see the profile form’s info being used in the mock order summary and constructed URL.
Below are how some of the fields in the “Demo 3” hosted example are configured…
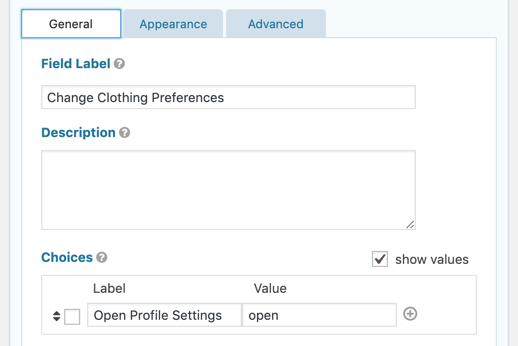
Firstly, for the profile form’s checkbox field, we use GF’s conditional logic rule to control display of the form’s other “clothing sizes” input fields. The image below depicts how the checkbox field is configured:
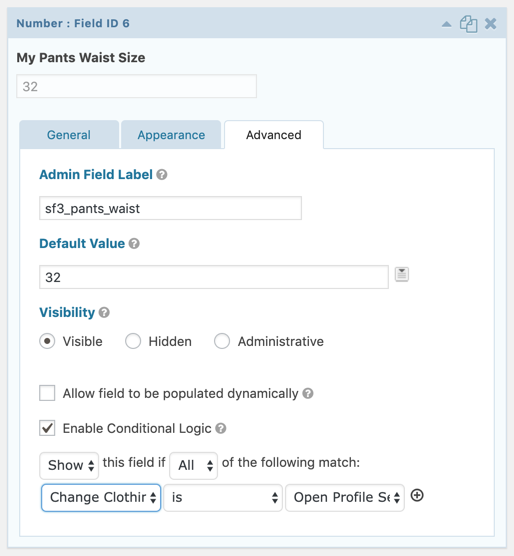
Then, when the “open” box gets checked, the various size fields are displayed (two Radio and one Number fields). Below is how the Number field is configured (notice how its Group Name is including the sf3_ prefix to MFSFS-enable this field):
On the second form - which could also be on another page entirely - we have a multi-page series of fields related to the clothing “order” being simulated. There are two Number fields for inputing the desired number of shirts and pants, both configured similarly to the Profile’s “sizes” Number fields, using the names sf3_num_shirts and sf3_num_pants.
Lastly, on page 3 “Review Order” you see a rendered HTML field, configure like this:
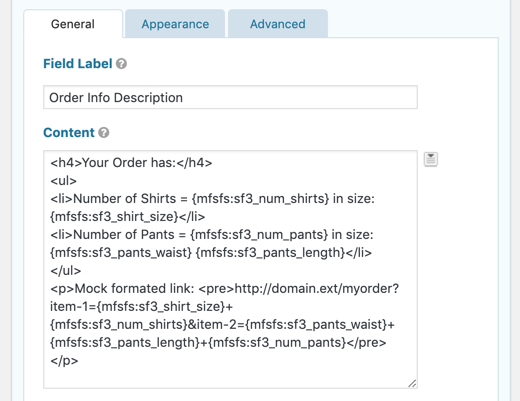
As you can see, the MFSFS plugin is providing an easy way to capture, save, and “share” input data. Additionally, the values saved in fields which are enabled with the form’s Group Name will be “sticky” which will cause them be auto re-populated whenever the user returns to the pages (Note, for anonymous visitors, your site’s configuration controls the retention time of their session data).
Minor Note On Admin Label Naming
Internally, MFSFS saves and retrieves enabled field values by referencing the field’s Admin Label. It requires using underscores ( _ ) for separators. Should you include spaces and dashes in your field’s Admin Labels, MFSFS will internally convert them all to underscores. This is generally only interesting to someone using PHP to acquire or change a field’s saved data. However, you could cause a collision issue if you tried to have two fields with same Group Name like demo5_My Book and demo5_My-Book - this would have MFSFS treating them both as if they were the same record.